
Replacing valve guides is a crucial engine repair, ensuring proper valve stem alignment and sealing; procedures range from liner installation to complete guide replacement.
What are Valve Guides?
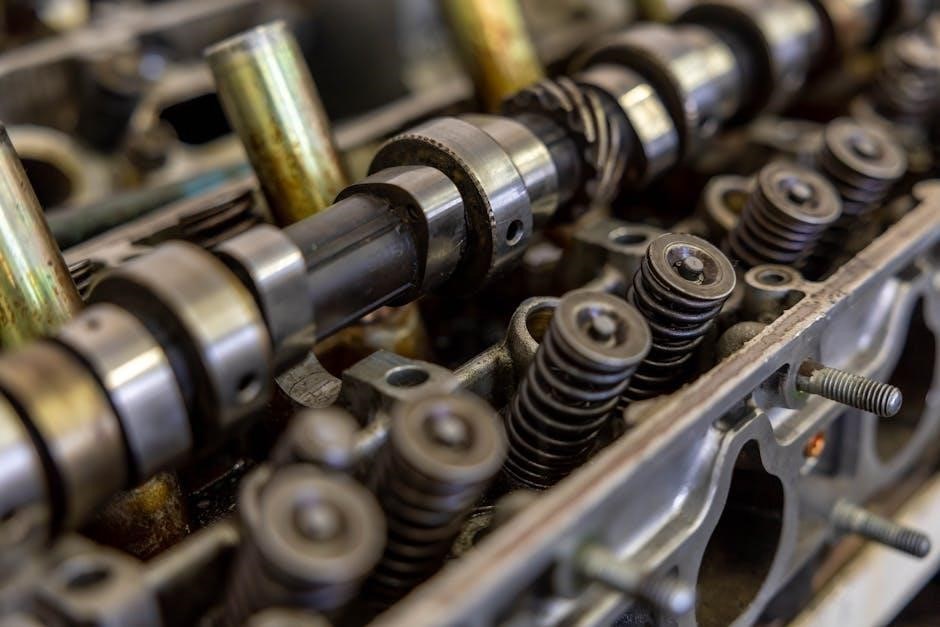
Valve guides are precision-machined components within the cylinder head, serving as a crucial interface between the valve stem and the cylinder head itself. They meticulously maintain correct valve alignment during operation, preventing unwanted side loading and ensuring optimal sealing against the valve seat. Typically constructed from durable materials like cast iron, bronze, or phosphor bronze, these guides withstand significant heat and wear.
Their primary function is to minimize valve stem wobble, contributing to efficient combustion and reduced emissions. Proper valve guide integrity is paramount for engine performance and longevity, necessitating occasional inspection and, when necessary, replacement.
Why Replace Valve Guides?
Valve guide replacement becomes necessary when wear and tear compromise their precision, leading to valve stem wobble and diminished sealing. This results in reduced engine compression, power loss, and increased oil consumption as oil bypasses the valve seals. Symptoms include noticeable exhaust smoke and a ticking sound from the valve train.
Furthermore, damaged guides can cause valve seat damage, necessitating costly cylinder head repairs. Proactive replacement during an engine rebuild or when addressing valve train issues prevents further damage and restores optimal engine performance.

Tools and Materials Needed
Successful valve guide replacement demands specialized drivers, hand tools, new guides, valve seals, lubricants, and potentially reaming/honing tools for precision work.
Specialized Valve Guide Tools
For effective valve guide replacement, several specialized tools are essential. A valve guide driver is paramount, used to carefully remove old guides and precisely install new ones. Different sizes are needed to accommodate various valve guide diameters. Reamers and honing tools are crucial for achieving the correct internal diameter and smooth surface finish, ensuring proper valve stem movement.
Furthermore, consider tools for heating the cylinder head evenly, aiding in guide removal. Insert guide installation tools are necessary when working with liners. Having the correct tools prevents damage to the cylinder head and ensures a professional, reliable repair.
Essential Hand Tools
Beyond specialized equipment, several standard hand tools are vital for a successful valve guide replacement. A high-quality socket set and wrenches are needed for engine disassembly and reassembly. Precision measuring tools, like micrometers and calipers, ensure accurate guide sizing and fit. A sturdy hammer, used with appropriate soft-faced attachments, aids in gentle guide removal and installation.
Screwdrivers, pliers, and picks assist with various tasks. A valve spring compressor is absolutely essential for safe valve removal and installation during the process. Proper hand tools contribute to a precise and efficient repair.
Necessary Supplies (Seals, Lubricants, etc.)
Successful valve guide replacement demands more than just tools; specific supplies are crucial. High-temperature valve stem sealant prevents oil leaks and maintains compression. Assembly lubricant minimizes friction during initial engine start-up, protecting new guides and valves. New valve stem seals are essential to replace old, deteriorated ones.
Cleaning solvents, like parts washer fluid, prepare components. Gaskets for valve cover and intake/exhaust manifolds are needed upon reassembly. Always use quality supplies for a reliable, long-lasting repair.

Preparation for Valve Guide Replacement
Engine disassembly, valve spring compressor use, and meticulous cleaning/inspection of all components are vital preparatory steps for successful valve guide work.
Engine Disassembly
Careful engine disassembly is paramount before valve guide replacement. Begin by draining all fluids – coolant, oil, etc. – and disconnecting the battery. Remove components obstructing access to the cylinder head, such as the intake and exhaust manifolds, and any associated wiring or hoses.
Detach the cylinder head, meticulously labeling all bolts and connections for reassembly. Inspect the head’s surface for any damage. Once removed, further disassembly involves extracting the valves, retainers, and keepers, preparing the head for valve guide removal and subsequent work.
Valve Spring Compressor Usage
A valve spring compressor is essential for safely removing and installing valves during valve guide replacement. Properly seat the compressor arms onto the valve keepers, ensuring even pressure distribution. Slowly and steadily compress the valve spring, relieving tension on the keepers.
Once compressed, carefully remove the keepers, then fully release the spring pressure. Exercise extreme caution; a released spring can cause injury. Reinstallation follows the reverse process, requiring precise keeper placement and full spring compression before release.
Cleaning and Inspection of Components
Thorough cleaning of all valve train components is paramount before reassembly. Use a solvent tank or parts washer to remove carbon buildup and grime from valves, heads, and springs. Inspect valves for wear, burning, or damage to the valve face and stem.
Carefully examine the cylinder head for cracks or deformation around the valve guide bores. Check valve springs for proper tension and any signs of fatigue or breakage. Replace any damaged or worn components to ensure optimal performance.
Valve Guide Removal Techniques
Effective valve guide removal involves utilizing a driver, applying heat to the cylinder head, and carefully addressing guides that are stubbornly stuck within the bores.
Using a Valve Guide Driver
Employing a valve guide driver is a common and effective removal method. Select a driver matched to the guide’s outer diameter and head bore size. Carefully align the driver with the guide, ensuring a straight and secure fit to prevent damage. Apply steady, even pressure while rotating the driver; avoid excessive force, which could distort the cylinder head.
For particularly tight guides, gentle heating of the head can aid removal. Periodically check alignment and lubrication during the process. A quality driver set offers various sizes for diverse engine applications, maximizing efficiency and minimizing the risk of component damage during this critical step.
Heating the Cylinder Head
Heating the cylinder head facilitates valve guide removal by exploiting thermal expansion. Apply heat evenly using a propane torch or hot plate, focusing on the area surrounding the guide. Avoid localized overheating, which can warp the head. Aim for a moderate temperature – typically around 200-250°F (93-121°C) – to loosen the interference fit.
After heating, promptly use a valve guide driver to remove the guide while the metal is still expanded. Exercise caution, as the head will be hot; wear appropriate protective gear. This method is particularly useful for stubborn or corroded guides.
Dealing with Stuck Valve Guides
When valve guides are severely stuck, a combination of techniques may be necessary. After heating the cylinder head, employ a valve guide driver with increasing force, ensuring it’s properly aligned to avoid damage. Penetrating oil can aid in loosening corrosion, applied liberally and allowed to soak.
If resistance persists, carefully consider using a pneumatic hammer with a suitable attachment, applying gentle, controlled impacts around the guide’s flange. Avoid excessive force, which could crack the head. Patience and methodical effort are key.
Valve Guide Installation Procedures
Proper alignment and depth are critical during installation; reaming and honing ensure a precise fit for smooth valve operation and optimal sealing performance.
Valve Guide Alignment
Achieving precise valve guide alignment is paramount for optimal engine performance and longevity. Utilizing a proper valve guide driver is essential, ensuring the new guide seats squarely within the cylinder head bore. Careful attention must be paid to avoid any angular misalignment, which can lead to premature valve wear, binding, and ultimately, engine failure.
Consistent and accurate alignment guarantees the valve stem maintains a straight path during operation, promoting efficient sealing and minimizing the risk of oil leaks. Thorough inspection with appropriate measuring tools confirms correct positioning before proceeding to further installation steps.
Proper Installation Depth
Determining the correct valve guide installation depth is critical for maintaining proper valve geometry and preventing binding. The guide must be inserted to the specified depth, as indicated in the engine’s service manual, ensuring sufficient support for the valve stem while allowing for free movement.
Insufficient depth can lead to valve instability and oil leakage, while excessive depth may restrict valve travel. Precise measurement and careful use of a guide driver are essential to achieve the correct installation depth consistently across all valves.
Reaming and Honing Valve Guides
After installation, reaming and honing valve guides are vital steps to achieve a precise inner diameter, ensuring smooth valve stem movement. Reaming establishes the initial size, while honing refines the surface finish for optimal lubrication and minimal friction.
Using properly sized reamers and honing stones is crucial; avoid excessive material removal. This process guarantees a consistent bore, preventing valve sticking and promoting efficient heat transfer, ultimately contributing to engine performance and longevity.

Different Types of Valve Guides
Valve guides come in cast iron, bronze, and phosphor bronze; material selection impacts durability, wear resistance, and compatibility with valve stem materials.
Cast Iron Valve Guides
Cast iron valve guides are a traditional choice, known for their excellent wear resistance and ability to withstand high temperatures encountered within the combustion chamber. They are typically used in older engine designs and some current applications where cost-effectiveness is a primary concern. However, cast iron can be prone to corrosion if not properly maintained, and may not offer the same level of lubricity as bronze alternatives. When replacing these guides, careful attention must be paid to proper fit and alignment within the cylinder head to prevent valve binding or oil leakage. Modifications, like installing thin-wall bronze liners, can sometimes enhance performance.
Bronze Valve Guides
Bronze valve guides represent a significant upgrade over cast iron, offering superior lubricity and reduced valve stem wear. This inherent quality minimizes friction and contributes to smoother valve operation, enhancing engine performance and longevity. They are often preferred in high-performance applications and engines requiring extended service intervals. When replacing guides, bronze’s softer nature necessitates precise installation to avoid damage. Techniques like knurling the guide bore or utilizing insert guides are common to ensure a secure and lasting fit, preventing looseness and maintaining optimal valve control.
Phosphor Bronze Valve Guides
Phosphor bronze valve guides build upon the benefits of standard bronze, incorporating copper to enhance wear resistance and strength. This alloy excels in demanding environments, providing exceptional durability and maintaining precise valve stem alignment during prolonged use. When replacing these guides, meticulous attention to detail is paramount. Proper sizing and installation techniques, including reaming and honing, are crucial to achieve a perfect fit and prevent premature failure. Their superior properties justify their use in high-performance and heavily stressed engines.
Specific Considerations for Different Engines
Engine type dictates guide replacement approaches; OHV, OHC, and high-performance engines require tailored techniques for optimal valve train function and longevity.
Overhead Valve (OHV) Engines
Replacing valve guides in OHV engines often presents accessibility challenges due to the pushrod valley. Careful disassembly is paramount, protecting vital components. Traditional methods, utilizing valve guide drivers and heating the cylinder head, are frequently employed. Ensuring proper alignment during installation is critical for longevity and preventing valve binding. Modifications, such as installing thin-wall bronze liners or even complete guide replacement, may be necessary depending on wear. Thorough cleaning and inspection of all related parts, including valve springs and retainers, are essential before reassembly to guarantee optimal performance and reliability.
Overhead Cam (OHC) Engines
Valve guide replacement in OHC engines typically requires meticulous timing belt or chain removal, demanding precise reinstallation to maintain engine synchronization. Access can be more straightforward than OHV designs, but careful handling of camshafts and related components is crucial. Specialized tools for valve spring compression are essential. Modifications, including installing insert guides or modifying the guide bore for oversized stems, are common practices. Thorough inspection and cleaning are vital, alongside ensuring proper alignment and depth during installation to prevent future valve train issues.
High-Performance Engines
High-performance engines often necessitate upgraded valve guides, frequently utilizing bronze or phosphor bronze for enhanced durability and heat dissipation. Modifications like knurling or installing thin-wall liners are common to optimize valve stem fit. Precise alignment and reaming are critical due to tighter tolerances and increased stress. Consider oversized valve stems for improved flow; guide bore modification becomes essential. Thorough inspection for cracks or wear is paramount, alongside meticulous installation to withstand elevated temperatures and RPMs, ensuring peak engine performance and reliability.
Post-Installation Checks and Adjustments
Post-installation, verify proper valve clearance and conduct leak-down testing to confirm a secure seal; a thorough valve train inspection is also essential.
Valve Clearance Adjustment
Valve clearance adjustment is paramount after a valve guide replacement, as new guides can subtly alter valve stem length and seating. Incorrect clearance leads to operational issues – too little causes burnt valves, while excessive clearance results in noisy operation and reduced efficiency.
The process involves meticulously checking the gap between the rocker arm (or cam follower) and the valve stem using feeler gauges. Adjustments are made via valve lash adjusters or threaded pushrods, ensuring they meet the engine manufacturer’s specifications. Precise adjustment guarantees optimal performance and longevity.
Leak Down Testing
Post valve guide replacement, leak down testing is essential to verify the integrity of the valve seals and guide installation. This procedure introduces compressed air into the cylinder with the piston at Top Dead Center (TDC), measuring air leakage.
Significant leakage past the valves indicates improperly seated valves, damaged valve seats, or faulty valve guides. Leak down testing pinpoints the source of compression loss, confirming the success of the repair and identifying any remaining issues requiring attention before engine reassembly.
Valve Train Inspection
Following valve guide work, a thorough valve train inspection is paramount. Examine valve springs for proper tension and signs of fatigue, replacing them if necessary to maintain correct valve closure. Inspect valve retainers, keepers, and valve stems for wear or damage, addressing any issues promptly.
Ensure rocker arms, pushrods (if applicable), and camshaft lobes are in good condition, as these components interact directly with the valves. Proper valve train function is crucial for optimal engine performance and longevity after guide replacement.
Troubleshooting Common Issues
Post-replacement, address looseness, binding, or oil leaks around guides; these indicate improper installation, damaged components, or head warping issues;
Valve Guide Looseness
Valve guide looseness presents as noticeable valve train noise, often a ticking or rattling sound, and can lead to reduced engine compression and performance. This issue typically arises from improper interference fit during installation, insufficient heating of the cylinder head before pressing in new guides, or damage to the guide bore itself. Careful re-inspection of the guide bore is essential, checking for ovality or scoring. If detected, machining or head replacement may be necessary. Correct installation procedures, including precise depth control and proper cooling, are paramount to prevent future loosening and ensure long-term reliability.
Valve Binding
Valve binding occurs when a valve doesn’t fully seat or move freely within its guide, leading to poor combustion and potential valve damage. This can stem from incorrect valve guide installation – misalignment, improper depth, or a rough inner surface. Binding also arises from valve stem bending or excessive carbon buildup. Thorough inspection of both valve stems and guides is crucial. Reaming or honing the guides to the correct size and ensuring proper lubrication during assembly are vital steps to eliminate binding and restore smooth valve operation.
Oil Leaks Around Valve Guides
Oil leaks around valve guides signify a compromised seal, often due to worn or damaged guides, or improper installation. A loose guide allows oil to seep past, entering the combustion chamber or externally leaking. Correct installation depth and a tight fit are paramount. Using appropriate sealant during installation further enhances the seal. Inspecting the cylinder head surface for imperfections is also essential, as these can prevent a proper seal. Addressing leaks promptly prevents oil consumption and potential engine damage.
Safety Precautions
Prioritize eye and hand protection during valve guide work; ensure proper ventilation to avoid inhaling harmful fumes from cleaning agents or heated metal.
Eye Protection
Eye protection is paramount when undertaking valve guide replacement, as debris like metal shavings, rust particles, and cleaning solution splashes pose significant risks. Always wear safety glasses with side shields, or preferably, a full face shield.
The removal process, especially when using a valve guide driver or applying heat, can generate projectiles. Even seemingly minor impacts can cause corneal abrasions or more severe eye injuries.
Protecting your vision ensures a safe and successful repair, preventing potential long-term complications. Do not compromise on this essential safety measure during any stage of the procedure.
Hand Protection
Hand protection is critical during valve guide replacement due to exposure to sharp edges on cylinder heads, valves, and the guides themselves. Wear heavy-duty, cut-resistant gloves to shield against abrasions and potential cuts.
Handling heated components necessitates gloves capable of withstanding high temperatures, preventing burns. Chemical resistance is also vital when using solvents or cleaning agents.
Proper gloves enhance grip and dexterity, improving control during delicate operations. Prioritize hand safety to avoid injuries that could disrupt the repair process and compromise your well-being.
Proper Ventilation
Proper ventilation is paramount when performing valve guide replacement, as the process often involves using solvents, cleaners, and potentially heating the cylinder head. These activities can release harmful fumes and vapors into the air.
Work in a well-ventilated area, ideally with an exhaust fan to remove airborne contaminants. Respiratory protection, such as a respirator, is recommended when dealing with strong chemicals or prolonged exposure.
Adequate airflow minimizes health risks and ensures a safe working environment, protecting your respiratory system from irritation and potential long-term damage.